
How to use the conciliator extension for OpenRefine and run your own server for it
conciliator is a software package created by Jeff Chiu that allows entity reconciliation with VIAF, ORCID, Open Library and Apache Solr collections out of the box.
Other than OpenRefine’s built in Wikidata reconciliation service, conciliator does not allow you to pull in additional data after successfully reconciling. It’s probably possible to pull in full records via “Add column by fetching URLs…” tough. Not played around with this yet.
https://github.com/codeforkjeff/conciliator
conciliatoris a collection of OpenRefine reconciliation services, as well as a Java framework for creating them.
It is possible to use the implementation on Jeff Chiu’s public server (https://refine.codefork.com/) for small scale reconciliations, but for larger projects one is asked not to tax this server and run one’s own (see below for instructions on doing this in a Windows environment).
Using conciliator in OpenRefine
Please do not use the public server for large projects, but run your own locally!
If you use your own instance make sure your Docker container is running throughout the reconciliation process.
Match sensitivity
The matching against VIAF is very sensitive to differences in punctuation or heading. E.g. attempting to match “Trotnow, Helmut.” will not get a perfect match as the “.” is not part of the headings matched against.
Presence or absence of dates can skew results a lot. E.g. “Trotnow, Helmut” scores only 0.577 against “Trotnow, Helmut, 1946-”. The absence of the date in the search term leads to a significant difference given how short the term is. The same will be true for titles, fuller form of name etc. Any $e (relator term) should definitely be removed before reconciliation.
Diacritics and special characters are likely also problematic.
Match modes
There are three ways to interact with the VIAF data via conciliator:
Reconcile against names from any VIAF source
| Docker image URL | Public server URL |
|---|---|
http://localhost:8080/reconcile/viaf |
https://refine.codefork.com/reconcile/viaf |
This is useful if you are not too sure that your search terms/headings match a specific source’s headings. E.g. dates can be problematic as “Trotnow, Helmut” will not match with “Trotnow, Helmut, 1946-”. Some contributing sources use “Trotnow, Helmut” as the heading though, so one would still get a match to the cluster.
Reconcile against a specific VIAF source1
| Docker image URL | Public server URL |
|---|---|
http://localhost:8080/reconcile/viaf/{source ID} |
https://refine.codefork.com/reconcile/viaf/{source ID} |
http://localhost:8080/reconcile/viaf/LC searches records contributed by the Library of Congress only |
https://refine.codefork.com/reconcile/viaf/LC searches records contributed by the Library of Congress only |
As per above you’ll want to be pretty sure about your search terms matching source headings to do this. Searching LC records with “Trotnow, Helmut” will not result in an outright, high confidence match as the LC heading is “Trotnow, Helmut, 1946-”. The match found is of rather low confidence at 0.577.
Reconcile against a specific VIAF source1 and retrieve the source IDs rather than VIAF cluster IDs
| Docker image URL | Public server URL |
|---|---|
http://localhost:8080/reconcile/viafproxy/{source ID} |
https://refine.codefork.com/reconcile/viafproxy/{source ID} |
http://localhost:8080/reconcile/viafproxy/{LC} searches records contributed by the Library of Congress and retrieves their LCCNs |
https://refine.codefork.com/reconcile/viafproxy/{LC} searches records contributed by the Library of Congress and retrieves their LCCNs |
Same caveats as above.
First time use (register reconciliation service)
Once you figured out which mode you want to use, and if applicable which source ID1, you’re ready to add it to the reconciliation services. Each combination of mode and source ID will need its own entry in the reconciliation services list.
Open your OpenRefine project and select “Reconcile” → “Start reconciling…” in the column of values you want to reconcile again VIAF.
Click “Add standard service” and enter the URL your choice of mode and ID requires. Click “Add service”.
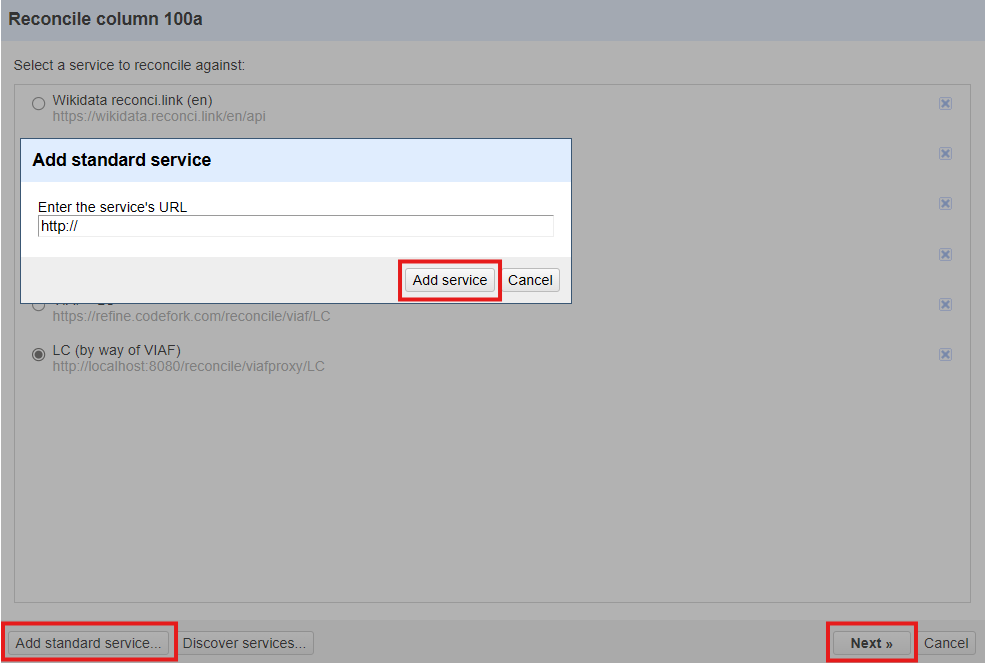
Reuse
Once registered you can simply select the respective service from the list. If using you own server, which you should do for any job over a couple of records, make sure your Docker container is running!
Run own instance in Docker on Windows
Prerequisites
A machine you have admin access on.
Install Docker Desktop and WSL
Docker allows you to run programmes in so-called containers that are isolated from each other and your operating system (operating system level virtualisation). The advantage of this is that the state of your operating system (your environment) doesn’t matter for the running of the programme; everything it needs is in the container and separate from your operating system. The core software that run and manages the containers is called the Docker Engine.
Download the Docker installer from https://www.docker.com/ and install. Your machine will require a restart after the installation.
Docker needs a Linux environment to run. This is where WSL (Windows Subsystem for Linux) comes in.
WSL is a Microsoft Windows component that allows the use of a Linux environment from within Windows. If you’re running Windows 11 it’ll already be installed.
When opening Docker Desktop it’ll prompt you to install WSL if it’s not there already, or to upgrade it if needed and tell you the respective commands to do so. To run them open e.g. a Command Line instance, paste the provided command in and press ‘Enter’.
Once installed you might see a new symbol, representing the Linux environment Docker is running on, in your File Explorer: 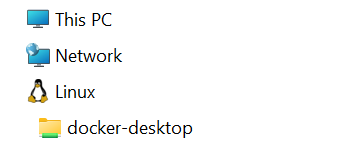 .
.
You also need to get a Docker account. You can e.g. use an existing Google account for that or create one with Docker.
Install Git and clone the conciliator repository
If you already have Git installed skip the Git installation.
Install Git
Download the latest release for your system from https://git-scm.com/install/windows and install it. Feel free to also get a GUI to use it with: https://git-scm.com/downloads/guis?os=windows. The following will be either command line or based on GitHub Desktop.
Now you need to do a bit of setup for Git. At the very least you’ll want to configure your username and email address. If you’re using a GUI it might guide you through this when you first start it up.
git config --global user.name "John Doe"
git config --global user.email johndoe@example.com
Some more Git vocabulary needed:
- repository: a folder within which Git was instructed to keep track of changes
- clone: making a copy of a server/remote repository on your computer
- pull: getting the latest changes from a server/remote repository
Clone the conciliator repository
When cloning a repository Git by default changes line endings2 to the ones native to your operating system. Usually that is a good thing. However, in this particular case that will be problematic, we need Linux line endings for the code to run in Docker. To get Git to change that behaviour run the following in the command line:
git config --global core.autocrlf false
You can revert it back to its default behaviour later if you want:
git config --global core.autocrlf true
To clone the conciliator repository from GitHub, you can use the command line or a GUI tool (GitHub Desktop in the images below).
-
Using the command line
Open a command line and navigate3 to the folder you want the repository to live. Then run the following command:
git clone https://github.com/codeforkjeff/conciliator -
Using GitHub Desktop
Go to https://github.com/codeforkjeff/conciliator.
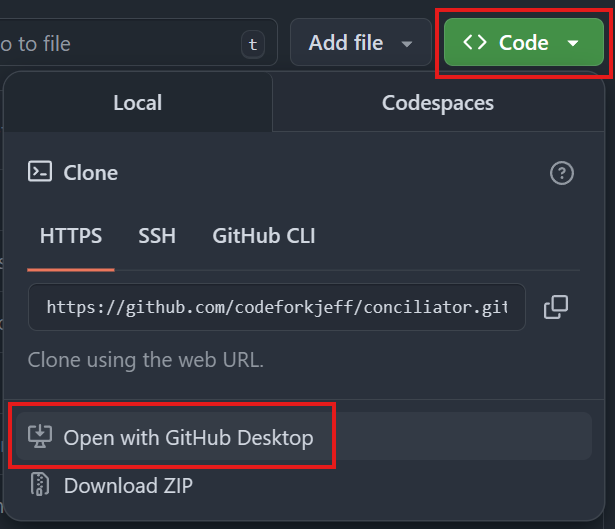
Click on “Code” and then “Open with GitHub Desktop”. Allow GitHub Desktop to be opened and select a place on your machine for the repository.
Build a Docker image
The next step is to build the code in the cloned repository into a Docker image, which in turn can then be run in a container.
Make sure the Docker Engine is running (i.e. Docker Desktop is open).
Open the command line and navigate to the folder containing the cloned repository3.
Run the following command to build the image:
docker build -t conciliator .
Make sure you don’t forget the dot at the end of the command, it matters!
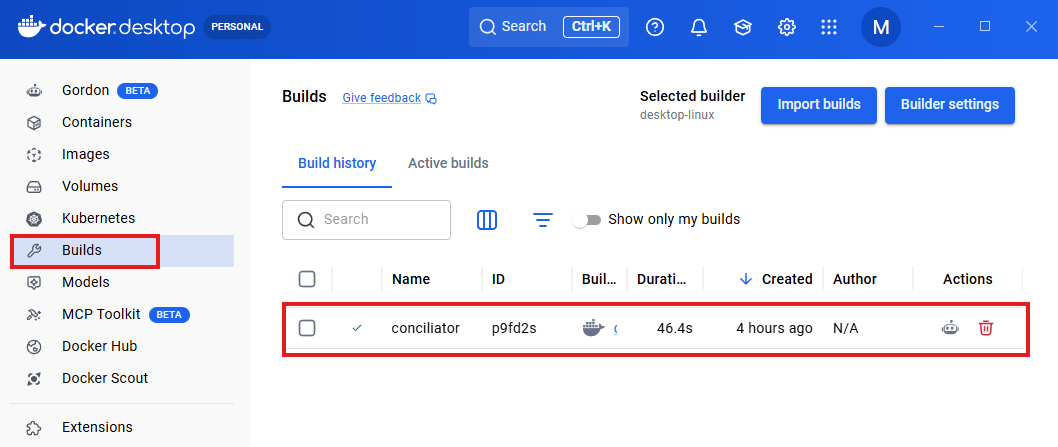
You’ll see a lot of text running by in the command line, let it do its thing. This might take a couple of minutes. Once it’s finished, you’ll have an entry called “conciliator” in Docker Desktop “Builds”:
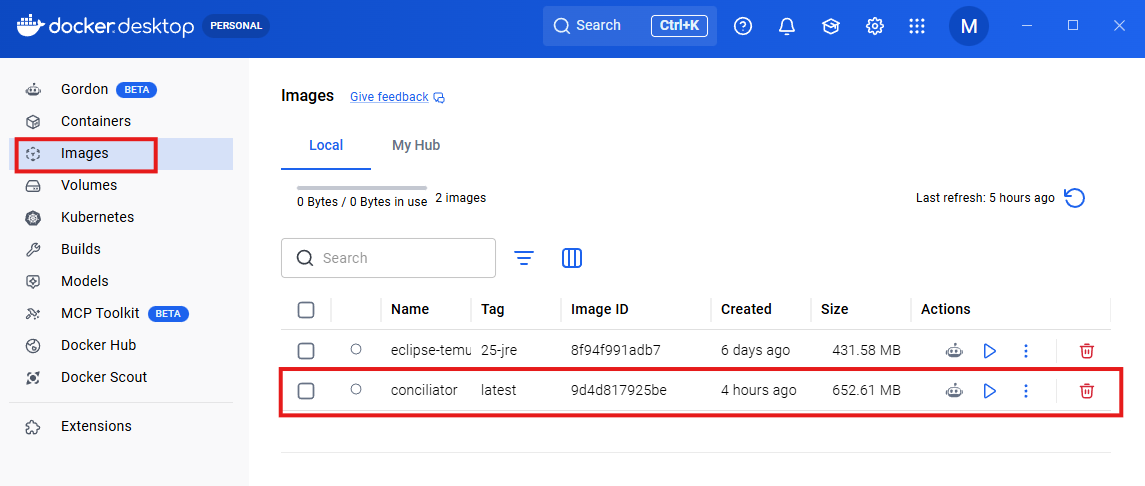
Given the build worked fine, there is now also an entry in “Images” called “conciliator”:
Run the Docker image in a container
Press the “Run” button (▷) in the “Actions” column of the “conciliator” image line. A new window pops up.
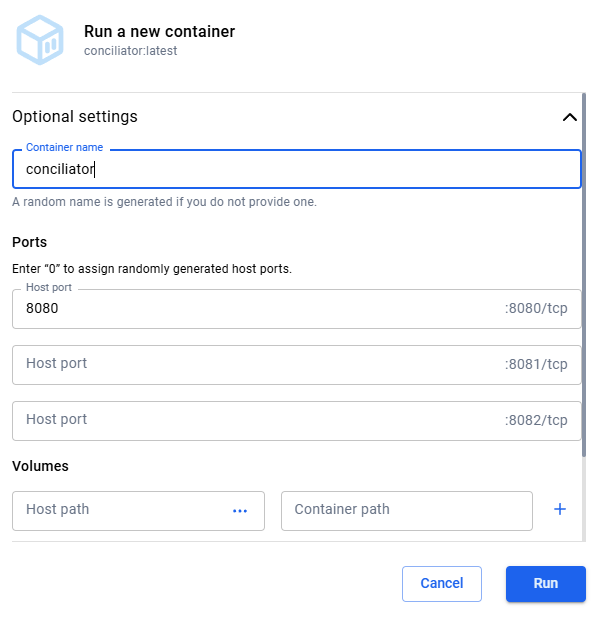
Expand the “Optional settings” and enter:
- a container name (or you can leave that blank and Docker will come up with something random and potentially funny 😋)
- 8080 in the first host port line
Click “Run”.
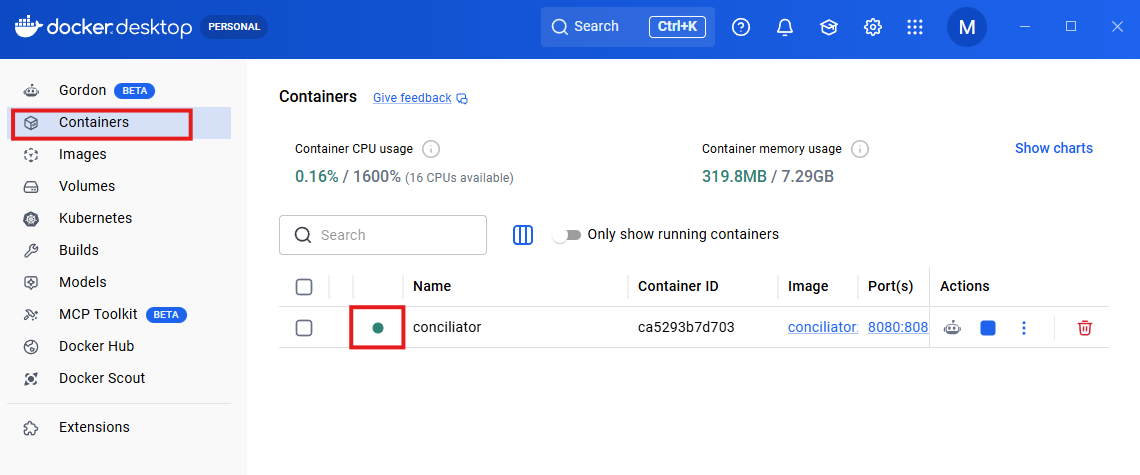
In the “Container” tab you can see if all went well and the container is running. There should be a green dot in front of the name.
If issues were encountered during the start-up of the container you’ll be taken straight to the “Logs” tab of the container.
Clicking on the container name takes you to the container dashboard.
You can stop the container by clicking on the blue “Stop” symbol (■) in the container list or individual container dashboard.
After the first run from the image, the container stays and can be reused by clicking the “Run” symbol (▷) in the “Actions” column of the respective container or the container’s dashboard. Do not re-run it from the image each time! If you do this you end up with loads of containers. This would only be necessary if something went wrong or the underlying image needs changing, e.g. because of a code update etc.
Your conciliator container must be running in order to use it for reconciliation in OpenRefine!
-
You can find a source’s ID by going to https://viaf.org/en and either hovering over the link and reading the code from the link preview, or clicking on it and then taking it from the URL itself. E.g. the URL for the National Library of Brazil is https://viaf.org/en/contributors?id=BLBNB, hence its source code is BLBNB. ↩ ↩2 ↩3
-
Line endings are control characters a system writes to mark the boundary between two lines of text. In Windows that typically carriage return (CR) followed by line feed (LF), where as Linux uses line feed only. See e.g. https://medium.com/@blazejsleboda/line-endings-on-macos-linux-and-windows-91b10fc61868 on the particulars. ↩
-
If you have no idea how to do this, here’s an easy way to open a command lines instance in the right place: open the File Explorer, go to the place you want, click into the address bar, type “cmd” and press “Enter”. ↩ ↩2